How to Dry Age Beef at Home: A Butcher's Complete Guide
Dry aged steak is one of those things that sounds impossible to replicate at home. The steakhouse charges an extra $30 for it. The butcher shop sells it at a premium. Surely you need some industrial-grade facility to pull this off.
You don't. What you need is a dedicated refrigerator, some basic equipment, patience, and the knowledge to do it safely. I've been aging beef professionally for years, and the process isn't complicated — it just requires understanding what's actually happening to the meat and controlling a few key variables.
This guide covers everything: what to buy, how to set up your aging environment, day-by-day expectations, when to trim, and the mistakes that ruin a perfectly good piece of beef.
Why Dry Age at Home?
The economics are straightforward. A dry aged ribeye at a steakhouse runs $70 to $120 per serving. A whole USDA Choice bone-in rib roast costs roughly $10 to $14 per pound at wholesale or club stores. After 30 days of aging and trimming losses, your per-steak cost lands between $20 and $30 — for results that rival any restaurant.
Beyond cost, there's the control factor. You choose the cut, the grade, the aging duration. Want 45-day aged beef with that intense funky flavor most restaurants won't go near? That's your call. Prefer a milder 21-day age? Also your call. Commercial operations optimize for yield and consistency. At home, you optimize for exactly what you want to eat.
Choosing the Right Cut
Not every cut of beef is worth dry aging. The process works best on large primal cuts with a good fat cap and substantial marbling. Here's what works and what doesn't:
Best choices:
- Bone-in rib primal (ribeye section): The gold standard. The fat cap protects the meat during aging, the bone adds structural support, and the heavy marbling means the concentrated flavor after moisture loss is extraordinary. Buy a 3 to 4 rib section (roughly 12 to 18 pounds).
- Bone-in strip loin: Another excellent option. Less fat cap than the rib section, so you'll lose slightly more to trimming, but the New York strip steaks you cut from it will be remarkable.
- Whole tenderloin: Possible but not ideal. Very lean, so the flavor concentration is less dramatic and trimming losses are proportionally higher. Only worth it if you specifically want aged filet.
Avoid:
- Individual steaks (too small — they'll desiccate before aging develops flavor)
- Boneless cuts under 5 pounds
- Pre-trimmed retail cuts with no fat cap
Grade matters. USDA Choice is the minimum for dry aging. The marbling provides flavor that survives moisture loss. Select grade beef lacks enough intramuscular fat and will taste dry and bland after aging. If you can find USDA Prime at a reasonable price (Costco occasionally carries it), even better — but Choice produces excellent results.
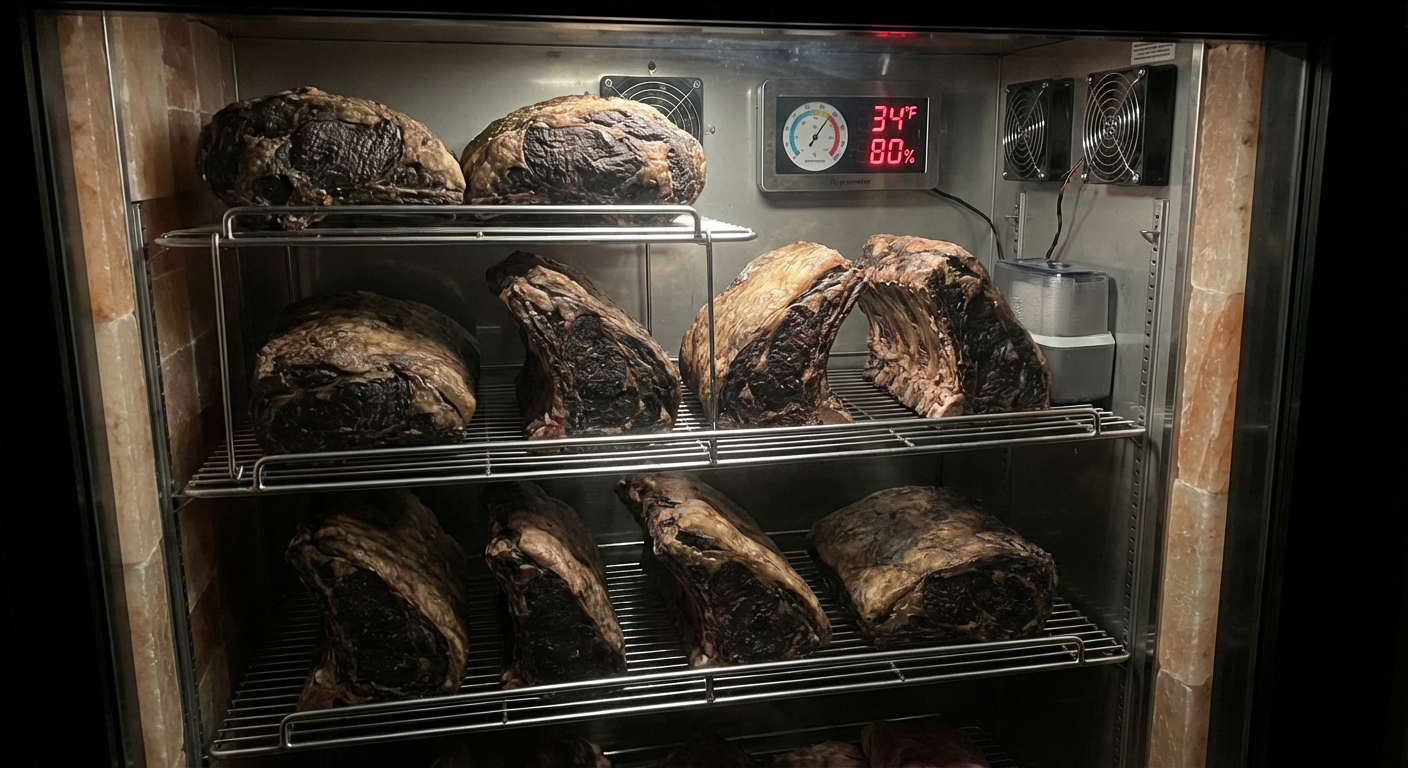
Equipment You Need
The setup is simpler than most people expect:
Dedicated Refrigerator
This is non-negotiable. You need a separate fridge that holds only the aging beef. A standard dorm-style or compact fridge (3.5 to 4.5 cubic feet) works perfectly for one primal cut. Don't use your kitchen fridge — every time you open the door, temperature and humidity fluctuate, other food odors contaminate the meat, and the crowded interior blocks airflow.
Used mini-fridges work fine. Older models without auto-defrost are actually preferable because they maintain more stable humidity. You can find suitable units for $50 to $100 secondhand.
Wire Rack
The meat must sit on a wire rack, not a solid shelf. Air needs to circulate underneath and around all surfaces. A standard baking/cooling rack that fits your fridge shelf works perfectly. Stainless steel is best — avoid chrome-plated racks that can corrode in the humid environment.
Small Fan
Constant air circulation is critical for even drying and preventing bacterial hot spots. A small USB-powered computer fan (40mm to 80mm) placed inside the fridge provides adequate circulation. Position it so air flows across the meat, not directly blasting one side.
Temperature and Humidity Monitoring
Buy a digital thermometer/hygrometer with an external probe or wireless display you can check without opening the door. Target ranges:
- Temperature: 34°F to 38°F (1°C to 3°C). Consistency matters more than hitting an exact number.
- Humidity: 75% to 85%. Below 70% and the meat dries too fast on the outside before enzymes work the interior. Above 90% and you risk mold problems.
If your fridge runs too dry, place a small pan of water with a sponge inside. If too humid, a small container of desiccant (silica gel or DampRid) helps absorb excess moisture.
Optional but Helpful
- Salt block or Himalayan salt tray: Placing the meat on a salt slab can help regulate surface moisture and add mild flavor. Not necessary, but some home agers swear by it.
- UVC light: A small germicidal lamp running on a timer (15 minutes every few hours) helps control unwanted mold. Not essential for shorter aging periods.
The Dry Aging Process: Step by Step
Day 0: Setup
- Clean the dedicated fridge thoroughly with a mild bleach solution (1 tablespoon per gallon of water). Rinse and dry completely.
- Install the wire rack and fan. Turn on the fridge and let it stabilize at 34-38°F for at least 24 hours before adding meat.
- Unwrap the beef primal. Pat the entire surface dry with paper towels. Do not rinse it.
- Place the meat fat-cap-up on the wire rack. Position it so no surface touches the fridge walls.
- Close the door. Leave it alone.
Days 1-7: Initial Drying
The exterior begins forming a dry crust (the pellicle). The meat's surface color will darken from bright red to deep burgundy. This is normal — it's dehydration, not spoilage. You might notice a faintly sweet, beefy smell when you open the fridge briefly to check. If you smell anything sour, ammonia-like, or putrid, something has gone wrong and the meat should be discarded.
Check temperature and humidity daily. Resist the urge to touch, poke, or flip the meat. The less you disturb it, the better the pellicle forms.
Days 7-14: Enzymatic Activity Begins
The natural enzymes (calpains first, then cathepsins) begin breaking down muscle fibers and connective tissue. The meat is getting more tender, though you won't see visible changes. The surface pellicle thickens and hardens. Some white mold may appear — this is typically Thamnidium, a beneficial mold that contributes to flavor development. It looks like fine white fuzz. Green, black, or slimy mold is bad — wipe it off with a vinegar-dampened cloth.
Days 14-21: Minimum Useful Aging
By day 21, you've reached the minimum threshold for noticeable flavor and tenderness improvement. The meat has lost roughly 10-12% of its original weight. The pellicle is firmly established. Enzymatic tenderization is well underway. If you're new to dry aging, this is a reasonable stopping point for your first attempt.
Days 21-30: The Sweet Spot
Most professionals consider 28 to 35 days the ideal window for home dry aging. Flavor complexity has developed significantly — you'll notice nutty, buttery notes that weren't present at day 21. Tenderness is dramatically improved. Weight loss reaches 15-18%. This is where the effort-to-reward ratio peaks.
Days 30-45+: Advanced Territory
Beyond 30 days, the flavor profile intensifies into what enthusiasts describe as "funky" — think blue cheese or aged Parmesan notes. This is polarizing. Some people love the deep complexity. Others find it overwhelming. Weight loss exceeds 20%, and trimming losses increase as the pellicle deepens. This territory is best explored after you've successfully completed a few 28-30 day ages and know you enjoy the flavor direction.
Trimming and Cutting
When your aging period ends, remove the primal from the fridge. The exterior will look intimidating — dark, hard, possibly moldy. This is exactly right.
Trimming the pellicle:
- Use a sharp, long-bladed knife (a carving knife or boning knife works well).
- Slice away the hardened exterior crust on all exposed surfaces. Cut until you reach meat that looks like fresh, deep red beef. On a bone-in cut, trim around but not excessively close to the bone.
- Remove any discolored fat. Some fat will have oxidized to a yellowish color — this is normal and can be trimmed or left depending on your preference. Rancid-smelling fat should be removed.
- Expect to lose 15-25% of the pre-aging weight to trimming, depending on aging duration.
Cutting steaks:
Once trimmed, cut your steaks to your preferred thickness. For dry aged beef, I recommend cutting at least 1.25 inches thick — ideally 1.5 to 2 inches. The concentrated flavor and dense texture benefit from a thicker cut that allows you to develop a deep sear while keeping the interior at your target doneness.
Any steaks you don't plan to cook immediately can be vacuum-sealed and frozen. Properly sealed dry aged steaks hold their quality for 6 to 12 months in the freezer.
Cooking Dry Aged Beef
Dry aged steaks cook differently than fresh steaks because they contain less moisture. A few adjustments:
- They sear faster and better. The drier surface means almost instant Maillard reaction. Use high heat — a cast iron skillet at 500°F+ or direct flame on a grill.
- They cook faster internally. Less water means heat transfers more efficiently through the meat. Reduce your expected cooking time by roughly 15-20% compared to a fresh steak of the same thickness.
- Don't overcook. Dry aged beef at medium-rare to medium is ideal. The concentrated flavors and tender texture are best appreciated when the interior stays pink. Overcooking past medium turns the density from buttery to tough.
- Season simply. Coarse salt and freshly cracked black pepper. The aging process created the flavor complexity — you don't need to compete with it. A finishing butter with herbs is a nice addition, but save the heavy marinades for grocery store steaks.
Common Mistakes to Avoid
Using your everyday fridge. Temperature swings from frequent door opening, cross-contamination from other foods, and inadequate airflow make this the number one cause of failed home aging attempts. A dedicated $75 mini-fridge pays for itself with the first successful batch.
Starting with too small a cut. Individual steaks or small roasts (under 5 pounds) lose too much volume to pellicle formation. By the time you trim, there's barely anything left. Always start with a whole subprimal — 10 pounds minimum.
Cutting the aging short due to appearance. First-timers often panic at the darkened, crusty exterior and assume something went wrong. The outside is supposed to look like that. Trust the process and your nose — if it smells beefy and slightly sweet, it's fine.
Inconsistent temperature. Every degree matters over a 30-day period. Temperatures above 40°F significantly increase spoilage risk. Below 28°F and you're partially freezing the meat, which disrupts enzymatic activity. Set it and monitor it.
Skipping the fan. Stagnant air creates moisture pockets where harmful bacteria thrive. The gentle airflow doesn't need to be strong — just consistent enough to prevent dead spots.
Aging low-quality beef. USDA Select or ungraded beef doesn't have enough marbling to survive the moisture loss. The result is tough, dry, and bland. Start with Choice at minimum.
Safety Considerations
Dry aging is a controlled decomposition process. Done correctly, it's perfectly safe. The keys:
- Temperature control is everything. The 34-38°F range inhibits pathogenic bacteria while allowing beneficial enzymatic activity. Monitor daily.
- The pellicle is your shield. The dried crust that forms on the exterior acts as a natural barrier against contamination. This is why you don't touch, poke, or cut the meat during aging — you'd break the seal.
- Trust your senses. Properly aged beef smells nutty, beefy, and slightly sweet. Spoiled beef smells sour, ammonia-like, or putrid. There's no subtlety to the difference — bad beef is unmistakable.
- Trim generously. When in doubt, trim more. The interior of a properly aged primal is perfectly safe. The exterior gets discarded anyway.
- Clean equipment between batches. Sanitize the fridge, rack, and fan between each aging session.
People have been dry aging beef for centuries — long before modern refrigeration existed. With a controlled fridge environment, you're operating at a much higher safety margin than traditional methods. Follow the temperature rules, trust the pellicle formation, and use common sense.
Is It Worth It?
The first time you sear a 30-day home-aged ribeye and taste the difference, you'll have your answer. The upfront investment is minimal — a used mini-fridge, a fan, a rack, and a thermometer. Ongoing cost is just the beef itself and electricity. The time investment is almost entirely passive: set it up, check on it occasionally, trim and cook when it's ready.
For anyone who loves steak and has a small amount of space to spare, home dry aging is one of the highest-return food projects you can take on. You're producing a product that costs $50 to $100 per pound at specialty butcher shops, using equipment that costs less than a single steakhouse dinner.
Start with a 28-day bone-in rib primal. Follow the setup guidelines. And prepare to never look at grocery store steaks the same way again.
Frequently Asked Questions
How long should I dry age beef at home for the first time?
Start with 28 to 30 days. This hits the sweet spot where flavor complexity and tenderness improvement are both significant without entering the polarizing 'funky' territory of longer ages. Once you're comfortable with the process and enjoy the results, experiment with longer durations.
Can I dry age beef in my regular kitchen refrigerator?
No. Your kitchen fridge has too much temperature fluctuation from frequent door opening, cross-contamination risk from other foods, and inadequate airflow. A dedicated mini-fridge ($50-100 used) is essential for consistent, safe results.
What does white mold on dry aging beef mean?
White fuzzy mold is typically Thamnidium, a beneficial mold that contributes to flavor development during dry aging. It's safe and normal. However, green, black, or slimy mold indicates a problem — wipe it off immediately with a vinegar-dampened cloth and improve your airflow.
How much weight will I lose during dry aging?
Expect 10-12% weight loss at 21 days, 15-18% at 30 days, and 20%+ at 45 days from moisture evaporation. You'll lose an additional 15-25% when trimming the dried pellicle. A 15-pound primal aged 30 days typically yields about 9-10 pounds of trimmed, cookable steaks.
What's the best cut of beef for dry aging at home?
Bone-in rib primal (the section ribeye steaks are cut from) is the best choice. The fat cap protects the meat, the bone adds structure, and the heavy marbling means the concentrated flavor after aging is exceptional. Buy a 3-4 rib section, USDA Choice grade minimum.
More Expert Guides
What Is Chateaubriand? (Cut, Cooking, & Best Sources)
Chateaubriand is a thick-cut roast from the center of the beef tenderloin, traditionally served for two. Learn what makes this classic French cut special and how to cook it.
14 min readWhat Is Round Steak? The Complete Guide to Beef's Most Versatile Budget Cut
Round steak comes from the rear leg of the cow — it's lean, affordable, and misunderstood. A master butcher breaks down every sub-cut, cooking method, and technique to turn this budget workhorse into genuinely delicious meals.
14 min readWhat Is Eye of Round? The Complete Butcher's Guide to This Lean Cut
Eye of round is one of the leanest, most affordable cuts in the entire beef case — and one of the most misunderstood. A butcher explains how to turn this budget-friendly roast into something genuinely delicious.