Steak Doneness Chart: Temperatures, Times & Visual Cues for Every Level
Every great steak comes down to one moment: pulling it off the heat at exactly the right time. Cook it thirty seconds too long and you've crossed from a perfect medium-rare into medium territory. Forget to account for carryover cooking and that beautiful pink center turns gray. It's the difference between a steak you'll remember and one you'll forget.
The problem is that most doneness charts floating around the internet give you a single temperature and call it a day. That's not enough. Doneness depends on the cut's thickness, the cooking method, the starting temperature of the meat, and how long you rest it afterward. A one-inch strip steak and a two-inch bone-in ribeye need completely different approaches to hit the same internal temperature.
This guide gives you everything: the exact target temperatures, the pull temperatures (what you should actually aim for before resting), visual cues, the finger test, and cut-specific guidance. Whether you're grilling, pan-searing, or using sous vide, you'll know exactly when your steak is done.
The Complete Steak Doneness Temperature Chart
Here's the definitive temperature chart. The key distinction most guides miss is the difference between your pull temperature and your final temperature. Carryover cooking raises the internal temp by 5–10°F after you remove the steak from heat, depending on thickness and cooking method. Always pull early.
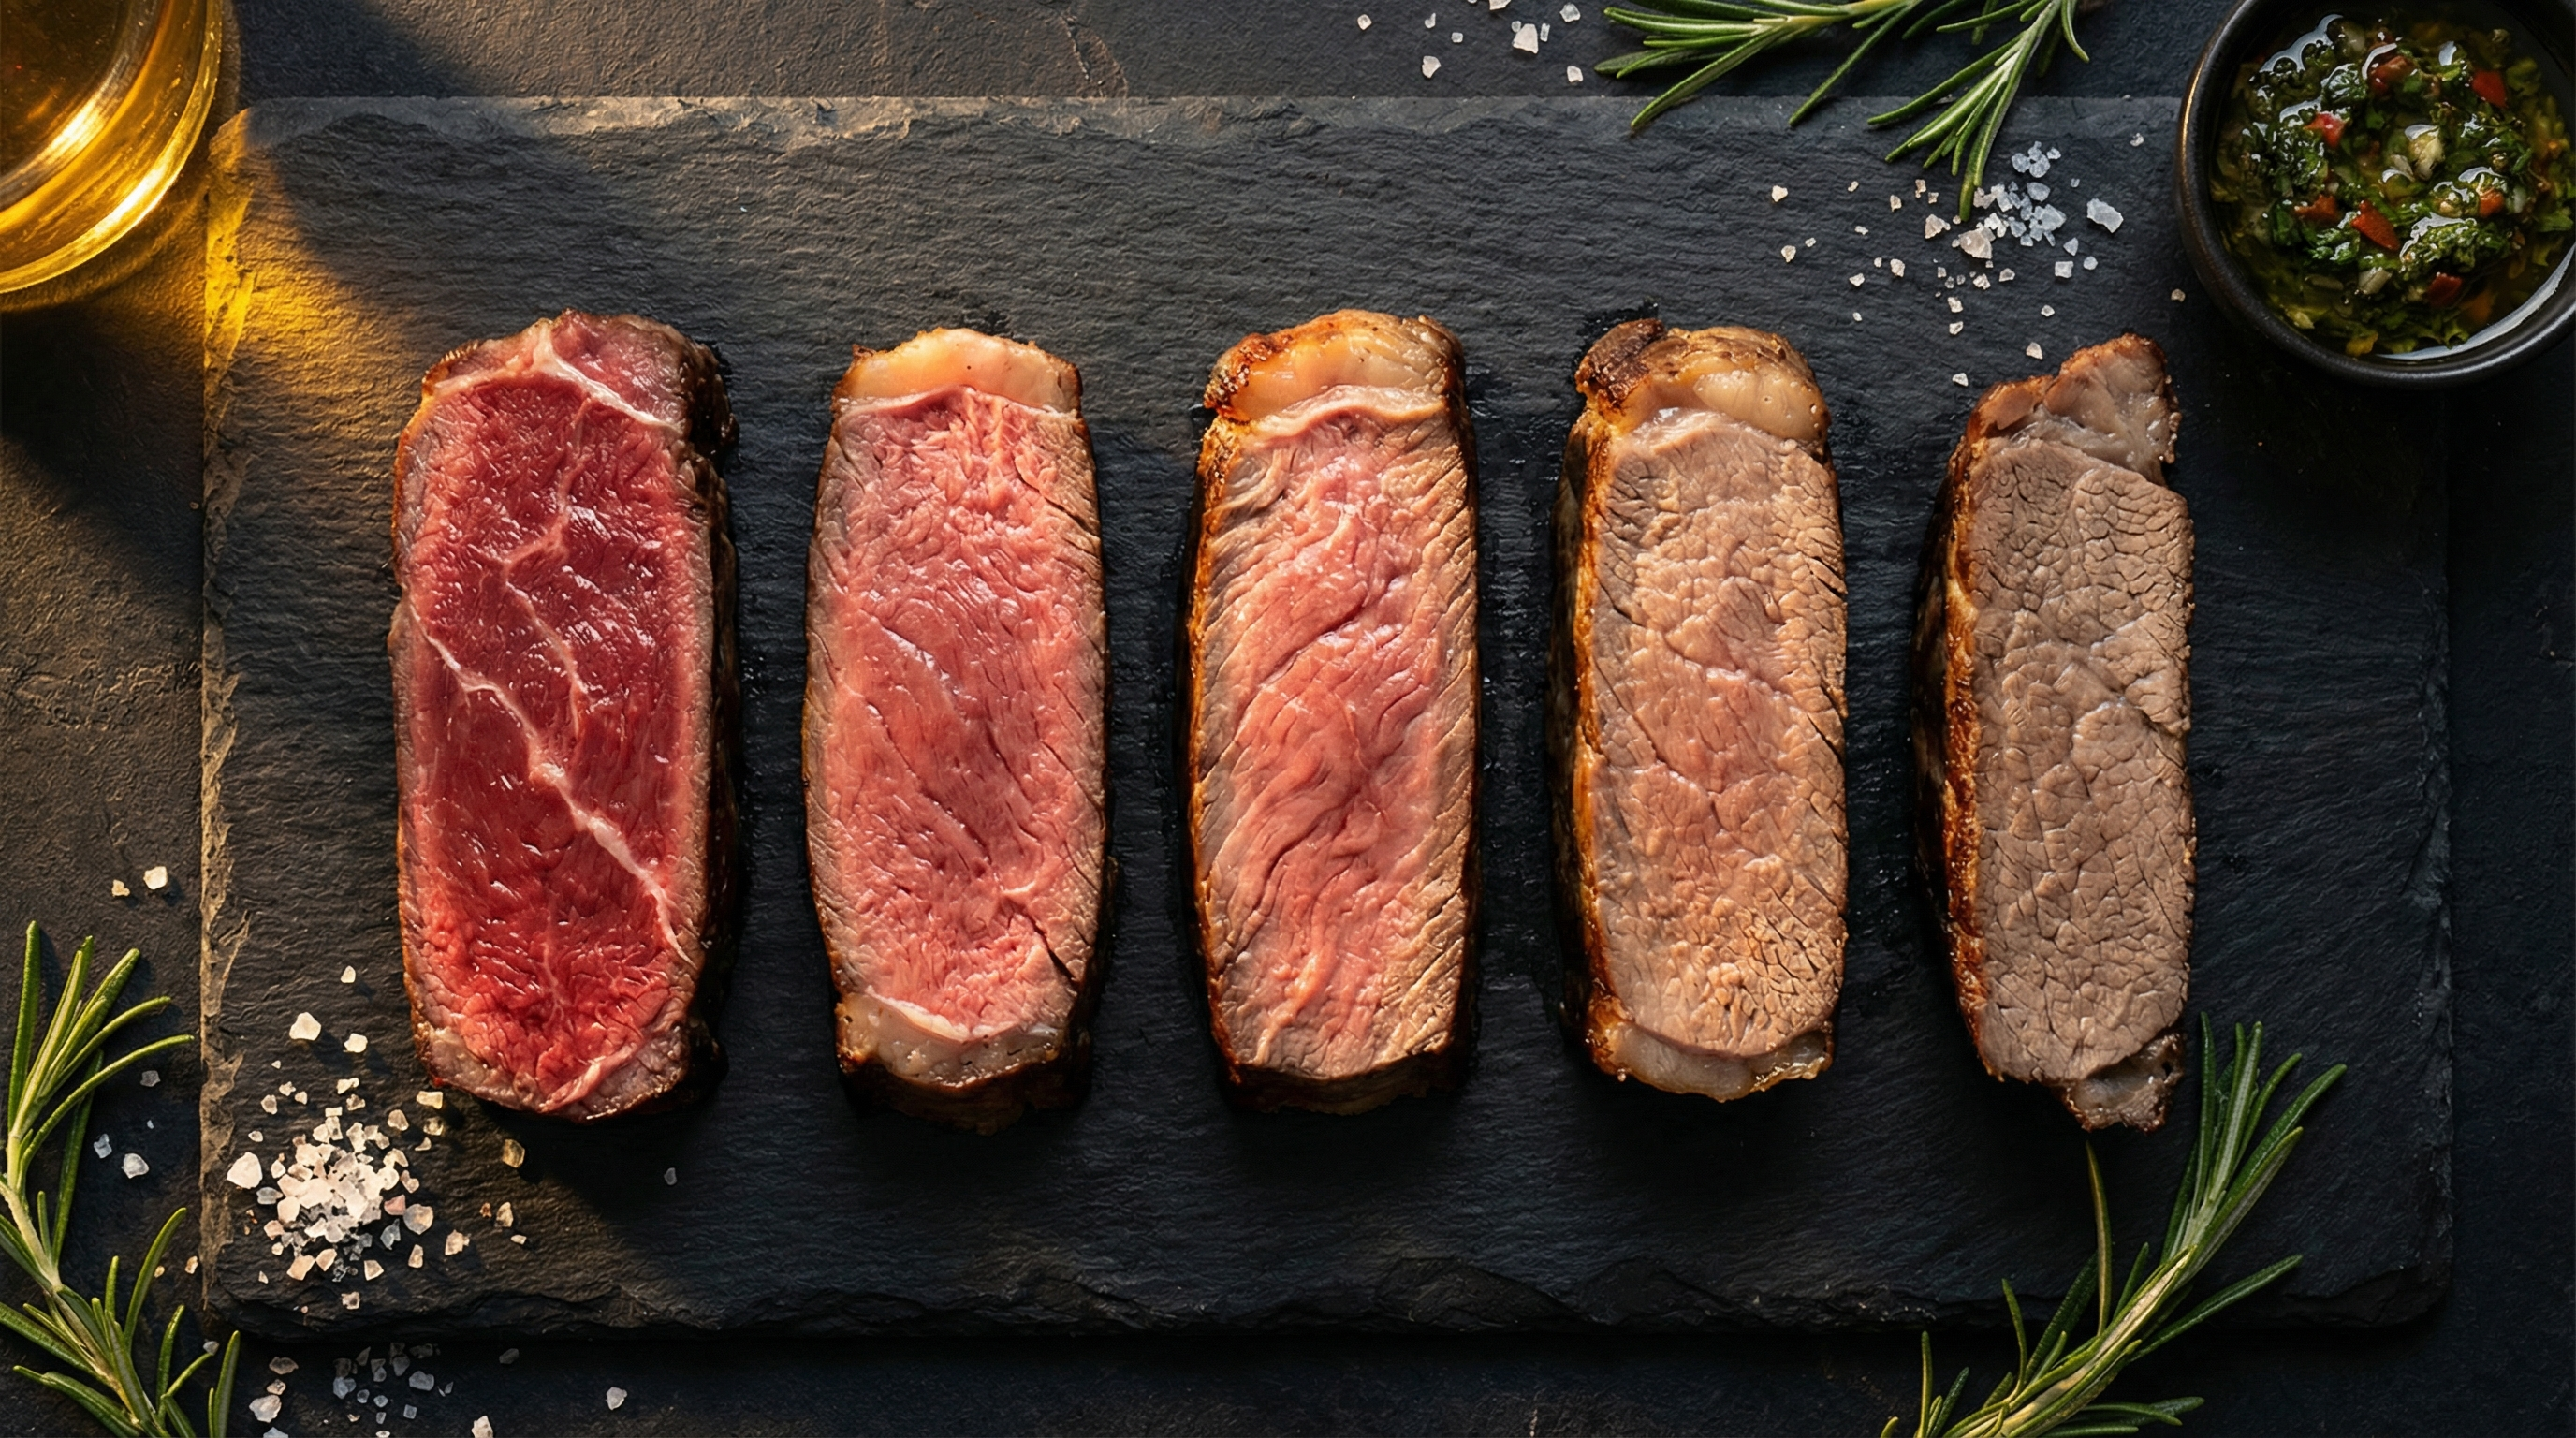
Blue Rare: Pull at 105°F → Final 110–115°F. The center is cool, deep purple-red, and essentially raw. Only the very outer surface is seared. The texture is soft, almost spongy. This is uncommon in American restaurants but popular in French and Japanese cuisine where the quality of the beef carries the dish.
Rare: Pull at 115°F → Final 120–125°F. A cool, bright red center that extends through about 75% of the steak. The outer quarter-inch shows a thin band of pink transitioning to brown at the seared crust. The texture is soft and yielding with a slight resistance. The meat is fully warmed but still has that raw, mineral quality that rare-steak lovers chase.
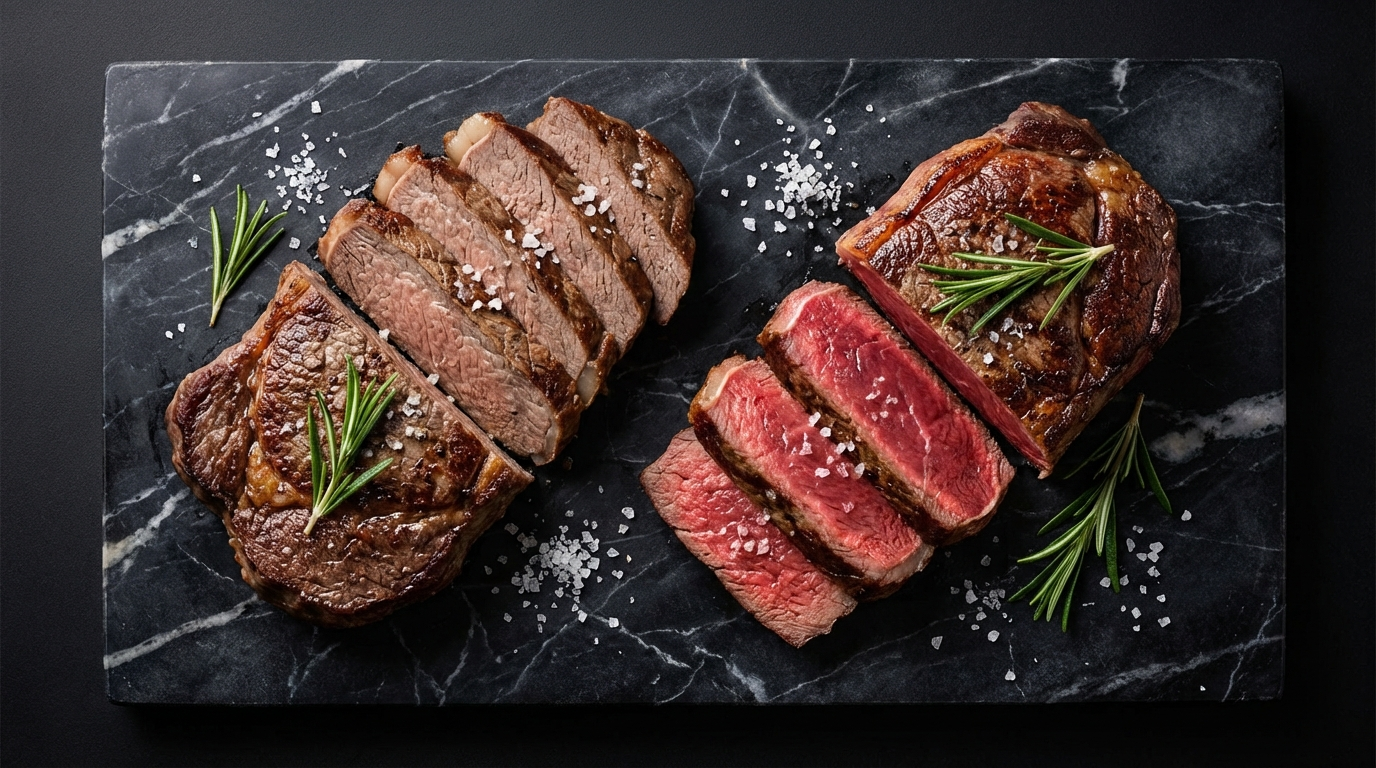
Medium-Rare: Pull at 125°F → Final 130–135°F. This is the sweet spot for most steaks and the doneness that steakhouse chefs, competition judges, and food scientists consistently recommend. The center is warm and uniformly pink-red, with a thicker band of brown at the edges. The fat has begun to render, the collagen has started to soften, and the Maillard compounds from the sear are in full effect. The texture is tender with a satisfying resistance—what most people describe as "juicy."
Medium: Pull at 135°F → Final 140–145°F. The center is pink but no longer red, and that pink band is narrower—roughly the middle third of the steak. More fat has rendered, which actually intensifies the beefy flavor in well-marbled cuts. The texture is firmer and more "steaky." Many people who think they prefer medium-rare actually enjoy medium, especially with fattier cuts like ribeye where the extra heat melts more intramuscular fat.
Medium-Well: Pull at 145°F → Final 150–155°F. Only a thin line of faint pink remains in the very center. The meat is predominantly brown-gray throughout. The texture is noticeably firmer and drier than medium, though a high-quality, well-marbled cut can still be enjoyable at this temperature. The rendered fat compensates somewhat for the moisture loss.
Well Done: Pull at 155°F → Final 160°F+. No pink remains. The interior is uniformly gray-brown. The texture is firm to stiff, and significant moisture has been lost—roughly 25–30% more than a medium-rare steak of the same cut. If you or your guests prefer well done, choose thicker cuts with more marbling (ribeye over filet) and consider a lower cooking temperature for longer to minimize toughness.
Why Carryover Cooking Changes Everything
Carryover cooking is the single most important concept in steak doneness, and it's the reason most home cooks overshoot their target. When you remove a steak from heat, the outer layers of the meat are significantly hotter than the center. That thermal energy continues migrating inward, raising the core temperature even as the surface begins to cool.
The amount of carryover depends on several factors:
- Thickness: A 2-inch steak can gain 8–10°F during rest. A 3/4-inch steak might gain only 3–5°F. The thicker the cut, the greater the thermal gradient between surface and center, and the more carryover you'll see.
- Cooking method: High-heat methods (broiling, searing over charcoal) create a larger temperature differential and produce more carryover than lower-heat methods (oven roasting, sous vide). A reverse-seared steak has minimal carryover because the interior is already evenly heated before the final sear.
- Bone-in vs boneless: Bones conduct heat differently than muscle tissue. A bone-in ribeye or T-bone will have slightly uneven carryover, with the meat nearest the bone staying cooler.
- Starting temperature: A steak that went on the grill straight from the fridge has a larger internal temperature gradient than one that was tempered at room temperature for 30–45 minutes. More gradient means more carryover.
The practical rule: pull your steak 5°F below your target for cuts under 1.5 inches, and 8–10°F below for thicker cuts. Then rest it. The temperature will coast up to exactly where you want it.
The Finger Test: How to Check Doneness Without a Thermometer
The finger test—also called the touch test or face test—is how professional line cooks check hundreds of steaks a night without poking each one with a thermometer. It's not as precise as an instant-read probe, but with practice, it's remarkably reliable and has the advantage of not puncturing the meat and releasing juices.
The concept is simple: different parts of your hand, when pressed, approximate the firmness of steak at different doneness levels. Here's how it works:
Open palm (Blue Rare): Relax your hand completely and press the fleshy area at the base of your thumb with your other index finger. That soft, yielding feeling—almost no resistance—is what a blue rare steak feels like when you press the center with your fingertip or tongs.
Thumb to index finger (Rare): Lightly touch your thumb to your index finger (don't squeeze) and press that same fleshy area. It's slightly firmer but still very soft. A rare steak has this gentle resistance—it yields easily but springs back slowly.
Thumb to middle finger (Medium-Rare): Touch your thumb to your middle finger and press the base of your thumb. The muscle firms up noticeably. This is the feel of a perfect medium-rare steak—it gives under pressure but springs back with a definite push.
Thumb to ring finger (Medium): The resistance increases significantly. The fleshy area feels taut and springy. A medium steak offers this kind of firm pushback—you can still indent it, but it bounces right back.
Thumb to pinky (Well Done): The base of your thumb becomes quite firm, almost hard. There's very little give. A well-done steak has this unyielding firmness when pressed.
A word of caution: the finger test is a skill that requires calibration. Your first dozen attempts will be rough estimates at best. The only way to improve is to use the finger test and a thermometer on the same steak, comparing your tactile impression with the actual temperature. After 30 or 40 steaks, you'll find your touch becomes remarkably accurate.
Visual Cues: Reading Your Steak's Surface
You can learn a lot about what's happening inside a steak by watching the outside. Professional grillers read these surface cues constantly, and while they're not a substitute for a thermometer, they help you know when to start checking.
Moisture beading on the surface: As a steak cooks, heat pushes moisture from the interior toward the surface. When you see tiny beads of juice forming on the uncooked top side of a steak, the internal temperature has reached approximately 120–130°F. This is your visual cue that rare-to-medium-rare is approaching. For a standard 1-inch steak over high heat, this typically happens 3–4 minutes into the first side.
Moisture pooling on the surface: When those beads turn into visible pools of liquid sitting on the top surface, you've passed medium-rare and are approaching medium (140°F). At this stage, the muscle fibers have contracted enough to squeeze out significant moisture. If you want medium-rare, you should have flipped the steak already.
Edges firming and contracting: Watch the perimeter of the steak. As it cooks, the edges will visibly tighten and pull inward. A steak that has contracted noticeably—the footprint on the grill is clearly smaller than when you placed it—is at least medium. Significant shrinkage (more than 15–20% of the original surface area) indicates medium-well or beyond.
Color of the juices: When you press the steak gently with tongs or a spatula, the color of the juice that emerges tells a story. Red juice means rare to medium-rare. Pink juice means medium. Clear juice means medium-well to well done. This is because the red color comes from myoglobin, a protein that denatures (changes structure and color) at specific temperatures—the same temperatures that define our doneness levels.
Why 130°F Is the Magic Number
There's a reason that virtually every chef, food scientist, and competition barbecue judge points to medium-rare as the ideal doneness for most steaks. It's not just preference—it's chemistry.
At 130–135°F, several things happen simultaneously inside the meat:
- Fat begins to render: Intramuscular fat (marbling) starts to melt and lubricate the muscle fibers at around 130°F. This is what creates the sensation of juiciness—it's not just water, it's melted fat coating your palate. Below this temperature, the fat remains solid and waxy. Above 150°F, so much moisture has been lost that even rendered fat can't fully compensate.
- Collagen softens: The connective tissue between muscle fibers begins to soften at this temperature range, making each bite more tender. Full collagen breakdown requires much higher temperatures (160°F+) and long cook times, which is why braising works for tough cuts—but for tender steaks, the partial softening at 130°F is the sweet spot.
- Myoglobin shifts color: The protein responsible for meat's red color undergoes its first major transformation at 140°F, shifting from red to pink. At 130–135°F, the myoglobin is in transition—warm enough to produce that appealing deep pink color without turning gray.
- Moisture retention peaks: Muscle fibers begin contracting and expelling water at around 140°F, with rapid moisture loss above 150°F. At 130–135°F, the fibers have warmed enough to be tender but haven't contracted enough to squeeze out significant juice. A medium-rare steak retains approximately 15–20% more moisture than a well-done steak of the same cut.
That said, the "best" doneness is the one you enjoy eating. If you prefer medium or even well done, own that preference. The goal of understanding the science isn't to judge—it's to help you hit your target consistently.
Doneness by Cut: Not All Steaks Are Equal
The ideal doneness varies by cut because different muscles have different fat content, collagen structure, and fiber density. Here's how to adjust your target for the most common steaks:
Ribeye (bone-in or boneless): Best at medium-rare to medium (130–145°F). The abundant marbling in ribeye needs heat to render. A rare ribeye wastes its best feature—all that fat stays solid and waxy instead of melting into buttery richness. Many ribeye lovers actually prefer medium (140–145°F) because the extra heat renders more intramuscular fat, intensifying the flavor. Don't go past medium though—the fat advantage disappears once too much moisture is lost.
New York Strip: Best at rare to medium-rare (120–135°F). Strip steak is leaner than ribeye, which means it dries out faster at higher temperatures. The flavor is clean and beefy, and that character shines brightest when the interior is still pink and juicy. The fat cap along one edge provides some insurance, but the lean center muscle benefits from conservative cooking.
Filet Mignon / Tenderloin: Best at rare to medium-rare (120–135°F). Filet is the most tender cut on the animal but also the leanest of the premium steaks. With minimal marbling to provide moisture and flavor at higher temperatures, filet becomes bland and dry past medium. Keep it pink. If you find filet too mild at rare, try medium-rare—the slight extra heat brings out more flavor without sacrificing tenderness.
T-Bone / Porterhouse: These are tricky because they contain two different muscles—strip on one side, tenderloin on the other—separated by a T-shaped bone. The tenderloin side cooks faster and is leaner. Target medium-rare (130–135°F) measured in the strip side, and accept that the tenderloin portion will be closer to rare. Position the tenderloin side away from the hottest part of the grill to even things out.
Flank / Skirt / Bavette: Best at medium-rare (130–135°F) maximum. These thin, coarse-grained cuts go from perfect to overcooked in a narrow window. They need high heat for a short time to sear the outside while keeping the interior pink. Past medium, the coarse fibers tighten dramatically and become chewy. Always slice against the grain after resting.
Tri-Tip: Best at medium-rare to medium (130–145°F). Tri-tip has moderate marbling and variable thickness across its triangular shape, which actually works in your favor—the thin point end reaches medium while the thick center stays medium-rare, giving everyone at the table their preference in one piece of meat.
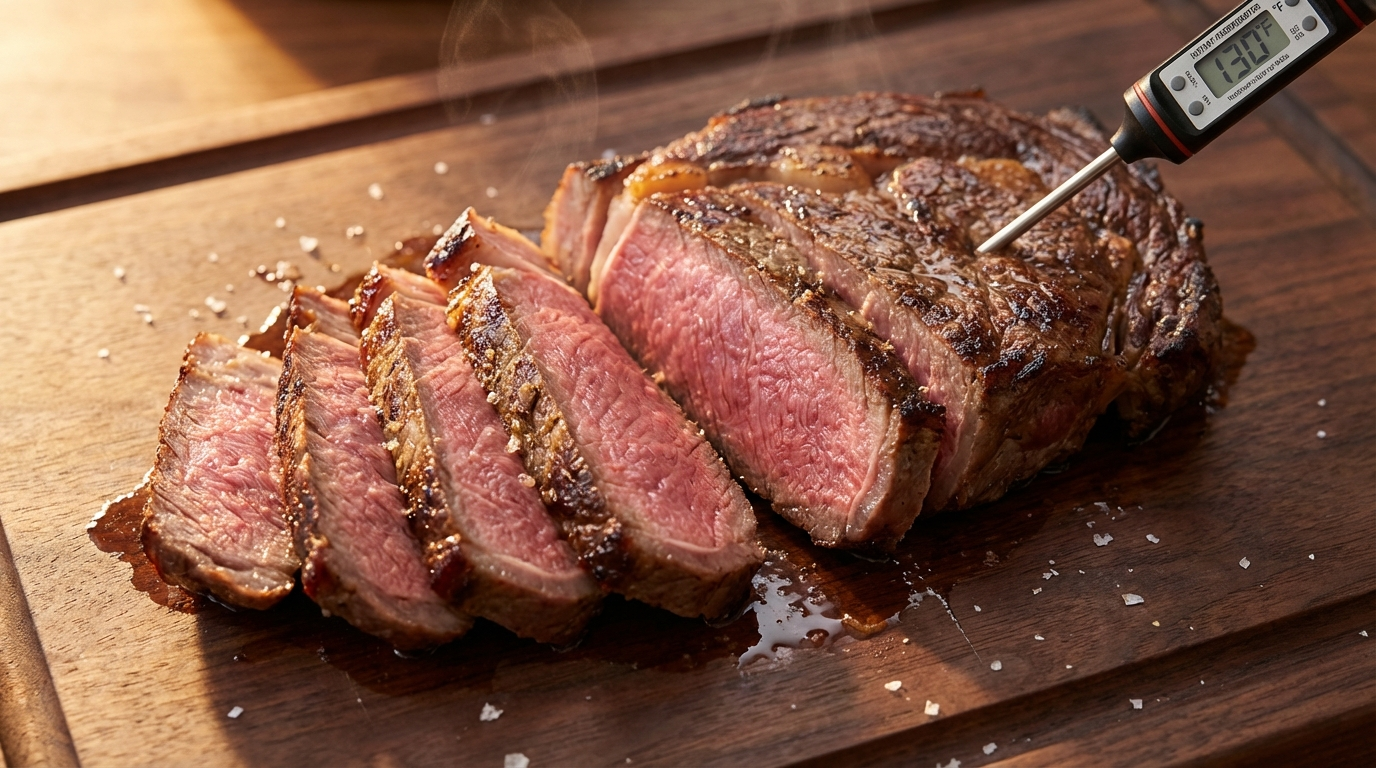
Using a Meat Thermometer: The Right Way
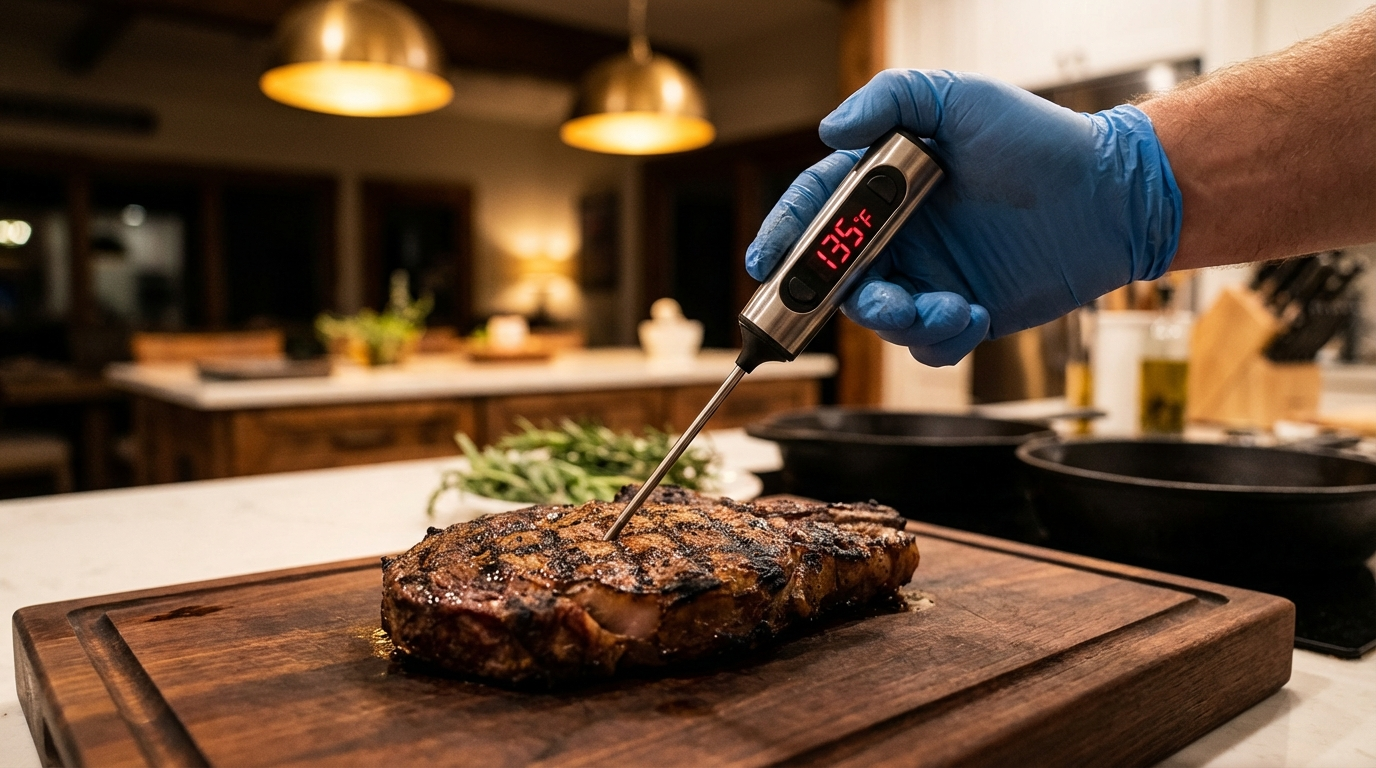
An instant-read thermometer is the single best investment you can make for your cooking. Not a leave-in probe (those are for roasts and smoking), but a fast-reading digital probe that gives you an accurate temperature in 2–3 seconds. The ThermoWorks Thermapen is the gold standard, but any instant-read with a response time under 4 seconds will work.
The technique matters as much as the tool:
- Insert from the side, not the top. Push the probe horizontally through the thickest part of the steak so the tip reaches the geometric center. Inserting from the top makes it easy to overshoot past the center or read the temperature of the lower surface instead of the core.
- Find the coldest point. Slowly push the probe through and watch the reading. The temperature will drop as you approach the center, then rise again as you pass through it. The lowest reading is your true center temperature—that's the number that determines doneness.
- Avoid the bone. Bone conducts heat differently than meat. If your probe touches bone, the reading will be inaccurate—usually higher than the actual meat temperature nearby. Keep the probe at least half an inch from any bone.
- Check multiple spots on thick cuts. A two-inch ribeye might have hot spots from uneven grill heat. Check the center and one spot near each end. Use the lowest reading as your guide.
- Account for the hole. Every time you puncture the steak, you create a channel for juice to escape. Limit yourself to 1–2 checks per steak. This is where the finger test earns its keep—use touch to gauge when you're getting close, then confirm with one precise thermometer reading.
Resting: The Step Nobody Wants to Wait For
Resting a steak after cooking is not optional—it's the final stage of the cooking process. During rest, two critical things happen: carryover cooking brings the center to its final temperature, and the muscle fibers relax and reabsorb some of the moisture that was pushed to the edges during cooking.
When meat is heated, the muscle proteins contract and squeeze moisture toward the surface and edges. If you cut into a steak immediately off the grill, that displaced moisture pours out onto your cutting board—what looks like a dramatic flood of juice is actually flavor and tenderness leaving the meat. After 5–10 minutes of resting, the fibers relax, the internal pressure equalizes, and the moisture redistributes more evenly throughout the steak. Cut into it now and far less juice escapes.
How long to rest: The general rule is 5 minutes per inch of thickness, with a minimum of 5 minutes for any steak. A standard 1-inch strip steak needs 5 minutes. A thick 2-inch bone-in ribeye benefits from 8–10 minutes. Don't rest longer than 10 minutes for any steak—at that point you're just letting it get cold.
Where to rest: Place the steak on a warm plate or cutting board. Do not cover it with foil—tenting with foil traps steam, softens the crust you worked hard to build, and actually increases carryover cooking (which means you need to pull even earlier). Let it rest uncovered in a warm spot. If you're worried about it cooling too fast in a cold kitchen, a plate warmed in a 170°F oven works perfectly.
What about the juices on the plate? Those resting juices are liquid gold—a mix of water, dissolved proteins, and rendered fat. Spoon them over the sliced steak or save them for a quick pan sauce. Never pour them down the drain.
Common Mistakes That Ruin Doneness
Even experienced cooks make these errors. Eliminating them will immediately improve your steak game:
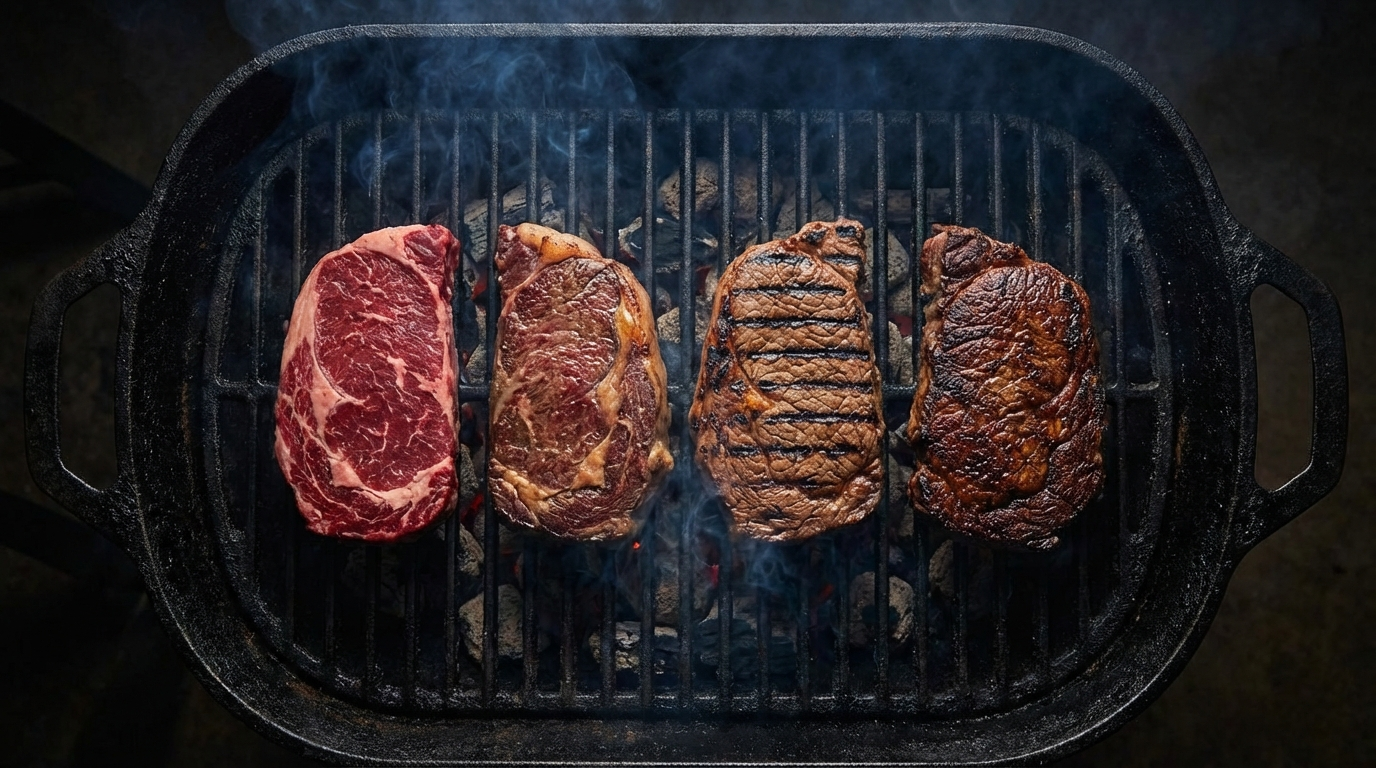
Cold steak on a hot grill. A steak straight from the refrigerator has a center temperature around 38°F. It needs to climb roughly 90–100 degrees to reach medium-rare. A steak tempered at room temperature for 30–45 minutes starts at 50–60°F and needs to climb only 70–80 degrees. The tempered steak cooks more evenly, develops a better crust (less time needed on the heat means less overcooked gray band), and gives you a wider window to hit your target. Pull your steaks from the fridge at least 30 minutes before cooking.
Not hot enough heat. If your pan or grill isn't ripping hot, the steak spends too long cooking before the surface sears. That extended time on heat overcooks the outer layers, creating a thick gray band of well-done meat around a medium-rare center. You want the surface to hit 400°F+ so the Maillard reaction happens in seconds, not minutes. A properly preheated cast iron skillet or a blazing hot grill grate is non-negotiable.
Flipping only once. The old advice to "only flip once" is outdated. Food scientist Harold McGee and chef Heston Blumenthal have both demonstrated that frequent flipping (every 30–60 seconds) actually produces more even cooking, a thinner gray band, and faster overall cook time. The steak doesn't need long, uninterrupted contact to develop a crust—it needs cumulative contact. Try flipping every minute and you'll see the difference.
Cutting to check doneness. Slicing into a steak to peek at the color is the worst way to check doneness. You lose juice, you disrupt the cooking process, and by the time the color registers in your brain, carryover has already pushed the steak past where it was when you cut. Use a thermometer or the finger test instead.
Ignoring thickness variation. Many steaks aren't uniform in thickness—a strip steak often tapers toward one end, a flank steak has thick and thin zones. The thin parts will be more done than the thick parts. Position thinner sections away from the hottest part of the heat source. For dramatically uneven cuts, consider the reverse sear: low oven first to bring the whole steak to a uniform internal temp, then a blazing-hot sear at the end.
Frequently Asked Questions
Frequently Asked Questions
Is it safe to eat rare steak?
Yes, for whole-muscle steaks (not ground beef). Harmful bacteria like E. coli live on the surface of meat, not the interior. Searing the outside to 300°F+ kills surface bacteria effectively. Ground beef is different—bacteria get mixed throughout during grinding, which is why burgers need to reach 160°F. For whole steaks, rare (120–125°F) is considered safe by food scientists, though the USDA officially recommends 145°F for all beef.
How do I cook a steak to two different doneness levels at once?
Use the reverse sear method. Start the steak in a 250°F oven until it reaches 10°F below your lower target doneness. Remove it, then sear one end of the steak longer on the hot pan or grill while giving the other end less direct heat. Alternatively, if cooking multiple steaks to different temperatures, pull each one when it hits its target—thinner steaks or lower doneness targets come off first.
Does the color of raw steak affect doneness?
No. Raw steak color varies based on packaging (vacuum-sealed beef is often purple-red and turns bright red when exposed to oxygen), age, breed, and diet. These differences disappear during cooking. A darker raw steak reaches the same color at the same internal temperature as a brighter one. Judge doneness by temperature and feel, never by raw color.
What's the gray band and how do I minimize it?
The gray band is the layer of overcooked (gray-brown) meat between the seared crust and the pink center. It's caused by prolonged cooking at moderate heat. To minimize it: use very high heat for a short time, flip frequently, temper the steak before cooking, or use the reverse sear method. Sous vide eliminates the gray band almost entirely because the whole steak reaches a uniform temperature before the final sear.
Should I use an oven thermometer or an instant-read probe?
For steaks, always use an instant-read probe thermometer, not an oven thermometer or a leave-in probe. Oven thermometers measure air temperature, not meat temperature. Leave-in probes are designed for roasts and smoking where you want continuous monitoring over hours. For steaks that cook in minutes, a fast instant-read probe (2–3 second response time) gives you the precision you need.
More Expert Guides
What Is Chateaubriand? (Cut, Cooking, & Best Sources)
Chateaubriand is a thick-cut roast from the center of the beef tenderloin, traditionally served for two. Learn what makes this classic French cut special and how to cook it.
14 min readWhat Is Round Steak? The Complete Guide to Beef's Most Versatile Budget Cut
Round steak comes from the rear leg of the cow — it's lean, affordable, and misunderstood. A master butcher breaks down every sub-cut, cooking method, and technique to turn this budget workhorse into genuinely delicious meals.
14 min readWhat Is Eye of Round? The Complete Butcher's Guide to This Lean Cut
Eye of round is one of the leanest, most affordable cuts in the entire beef case — and one of the most misunderstood. A butcher explains how to turn this budget-friendly roast into something genuinely delicious.